Occasionally in your HubSpotting you'll find a need to create something that it doesn't really do natively. The good thing about HubSpot is, if you think of it, there's a way to build it. Either directly in the platform, or through an integration, or both.
I recently found myself needing a date field that would automatically adjust when the date had passed. Which is something that might come up in your day-to-day needs.
Some of the examples of an automatically updating date field could be:
- A sales followup date for cold leads that triggers a task every few months, date reset when sales outreach is logged
- A competitor contract renewal date, updating annually based on when a company signs with a competitor
- A rolling 60-day field for due payments
In short, you have a date stamp field with something like 2/2/2023 and need it to auto-update to 3/2/2023 or even 2/2/2024 automatically (based on either the passing of that date or an event trigger).
You can update these manually, but every longtime CRM admin knows manual updates eventually stop occurring. You could export and update in Sheets or Excel then re-upload, but when? There are 365 days in the year and each day you don't upload an update means outdated data (pun terrible and intended).
Inevitably any manual update process wouldn't keep up with the volume and lead to outdated or incorrect info.
So here's how I create auto-updating date fields. For this case I'll use a Comptetitor Contract Renewal Date. The idea here is, you lose out on a deal to a competitor but you know it's an annual contract. So you can set a date in this field to know when to follow up next year.
And if you don't win the business next year, then the field will reset for the year after that. And the year after that, etc.
1. Create your field as a date field. (If you have a Today's Date field created, you can also create a Days Until ____ date field, which is a calculated property that will show the number of days between today and the target day)

2. The field needs to be initially populated. You can populate dates in your field with an initial upload, populate it via a workflow, or just have sales input it as part of a requirement of a Closed-Lost deal.
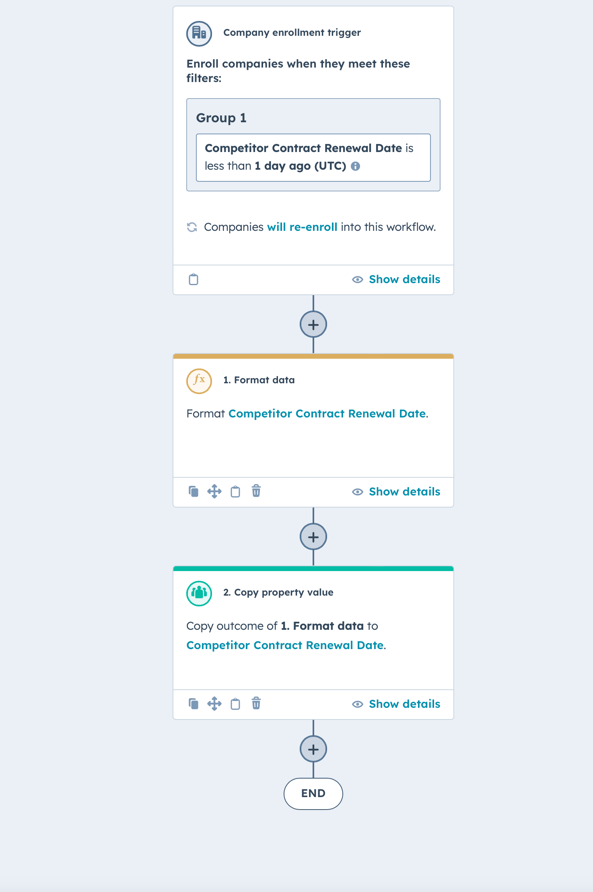
3. Create a workflow, with the trigger being "Your New Date Field" is Less than 1 Day Ago (which will enroll it when the date has passed). If you want an action based trigger, you can use something like "Last Sales Email Date" or "Last Activity Date" is Less Than 1 Day Ago

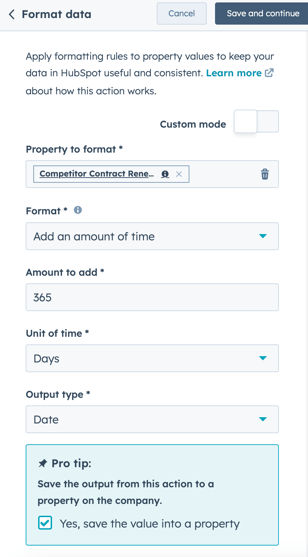
4. In that workflow, create a Format Data action from the Data Ops section of options. Then select your date field, and "Add an amount of time". Customize the Amount to Add and the measurement (half days, days, minutes, seconds, years), then select Date as the output.
For this example, I chose to add 365 days. A year would obviously do the same trick.

5. If you click the "Yes, save the value into a property" option, HubSpot will prompt you to select the field you've already chosen to manipulate (but if you wanted to push the value into another field, like Competitor Renewal Date 2025, this is where you would set that as well).
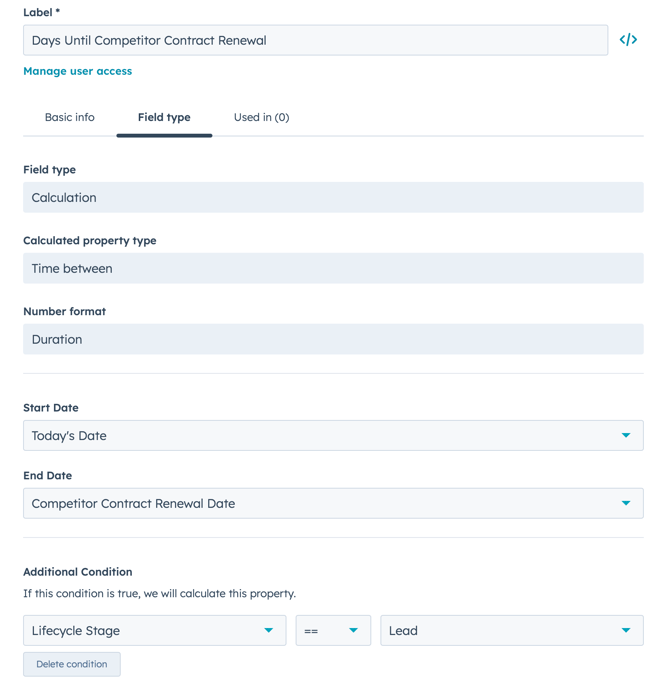
6. Finally, you can build a field signifying how many days remain between today's date and your new field's date. First, you need to build a field that's populated with Today's Date, then create a calculated field, with a calculation type of Time Between. The start date is Today's Date, end date is your selected field. You can also restrict this calculation to objects that meet specific criteria such as a certain lifecycle (see screenshot below).
This field is optional. Workflows and other processes like lists can be built around the date field using the "__ days from now" criteria, but being able to see the number of days left can help with things like surfacing potential outreach opportunities to sales, or in reports.

And that's it! Using this process will enable your date fields to continue moving forward indefinitely.
Tags:
HubSpot TutorialsJan 9, 2024 9:32:21 PM


