With email providers like Google and Yahoo looking to crack down on spam in 2024, email deliverability for your domain is at risk.
You have three initiatives to pursue:
- Rethink your spray-and-pray email philosophy and aim for something more focused and helpful
- Clean out your database of people that are likely to report you as spam, such as contacts who've never opted into your emails and contacts who haven't engaged with email in a long time
- Finally, button up the operational side of your emails by ensuring the inclusion of unsubscribe buttons and adding things like DKIM and SPF records to your domain
This article specifically refers to the process of setting up a DKIM record in Bluehost. There are a lot of articles referencing how to do this, but they're all outdated. Bluehost updated their DNS editing interface in 2023 and honestly, it isn't nearly as intuitive as it used to be. HubSpot's article on setting up a CNAME record in Bluehost is outdated, so I figured I would write out my own tutorial.
How to Set up a DKIM Record for your Hubspot sending domain in Bluehost
To set up a DKIM record for your HubSpot sending domain in Bluehost, follow these steps:
1. In HubSpot, go to your settings (gear icon in the upper right), then Websites, then Domains and URLs
2. Click Connect a Domain, then select Email Sending
3. Follow the prompts from there, and eventually you'll get to a page with records that you need to populate in Bluehost.
This is where most instructions are outdated. Keep this tab open and in a new tab, navigate to Bluehost.
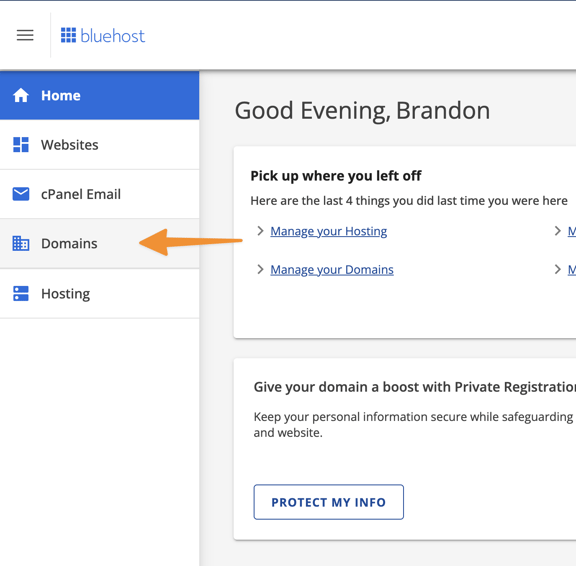
4. Log in to your Bluehost account and go to your domains.
5. Open the Settings on the domain you want to edit
6. Scroll down to the section titled Advanced Settings and click on Manage by the Advanced DNS Records

7. It'll warn you that DNS edits should be handled by professionals, and they're right...but hey, we need to get a DKIM setup, so let's move ahead.
8. Navigate to the CNAME section and click Bulk Edit
9. Find two blank rows (or click Add more CNAME records if there are no blank rows).
10. In HubSpot, copy the value for Host, paste it into the "Alias" field in Bluehost.
11. In the TTL field, set 14400
12. Leave "Refers to Host Name" blank
13. In HubSpot, copy the value in "Required Data" and paste it into the "Other Host" field.
14. Repeat this for the second set of values HubSpot provides. Then, click Continue and confirm the changes.
15. Return to HubSpot and click Verify. This can take up to a couple days, but in my experience it works in a few minutes. Your selected domain will now appear in the Email Sending Domains section with a green dot next to it.

Once you have completed these steps, you have successfully set up a DKIM record for your HubSpot sending domain in Bluehost. Happy emailing!
What is a DKIM and What Does it Enable in HubSpot?
In order to ensure email deliverability for your domain, it is crucial to take proactive measures, especially with email providers like Google and Yahoo cracking down on spam. One effective way to enhance deliverability is by adding DKIM (DomainKeys Identified Mail) records to your domain.
DKIM is an email authentication method that adds a digital signature to your outgoing emails, verifying that they were sent by your domain and have not been tampered with during transit.
Once the above setup process is complete and verified, your domain will have a green dot next to it in the Email Sending Domains section of HubSpot, indicating that your emails are authenticated and have a higher chance of reaching their intended recipients' inboxes. So, take the necessary steps to protect your domain's reputation and improve email deliverability by setting up a DKIM record in Bluehost.